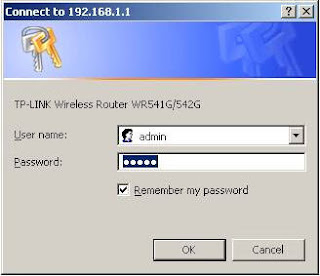
192.168.1.1), then press Enter.

When you are prompted, enter the TL-WR1043ND´s username and password (the default username and password are both admin)
Step 2: Go to Access Control -> Host, then click "Add New..."

Select "IP Address", then enter a short description for the host rule you want to define in the "Host Description:" box. Enter the IP address range on your network that you want to block access to (i.e. 192.168.1.100 - 192.168.1.199, which will block access to the site(s) you define in the following steps for ALL computers that are automatically assigned an IP address by the TL-WR1043ND)
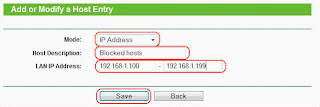
Click "Save" - the new Host rule will now show up on the "Host Settings" page

Step 3: Go to Access Control -> Target, then click "Add New..."

Select "Domain Name" in the "Mode:" box, then enter a brief description of the rule you are setting up. In the "Domain Name:" box(es), enter the keywords you would like the router to block (these do not have to be full web addresses such as www.google.com - simply entering "google" will set the rule to block ANY domain name that contains the word "google")
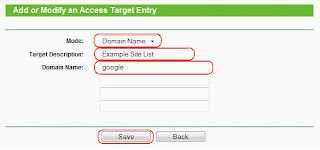
Click "Save" - the new Target rule will now show up on the "Target Settings" page

Step 4: Go to Access Control -> Rule and tick "Enable Internet Access Control", then select the option "Allow the packets not specified by any access control policy to pass through the Router" (if this is set to the "Deny" option, all websites other than ones you have set Host/Target rules for will be blocked), then click "Save"
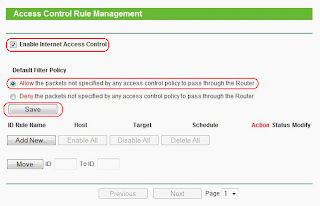
Under Access Control -> Rule, click "Add New...", then enter a brief description of the rule in the "Rule Name:" box In the "Host:" box, select the Host rule you defined in Step 2 In the "Target:" box, select the target rule you defined in Step 3 In the "Schedule:" box, select "Anytime" (this will make the rule always active) In the "Action:" box, select "Deny" In the "Status:" box, select "Enabled"
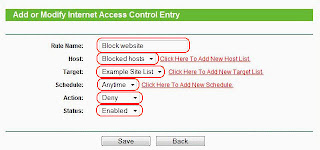
Click "Save" - the new Access Control rule will now show up on the "Access Control Rule Management" page.

Step 5: To test the rule, try to browse to the site you have blocked from a host PC in the IP address range you defined in the Host rule in Step 1 (for instance, http://www.google.com). The website will be blocked, and your web browser will report that the site/server cannot be found
0 komentar:
Posting Komentar